Screenshots are a lifesaver. There’s no two ways about it. They are quick to click and even quicker to share. But not a lot of avid gamers know how to invoke the screenshot feature in gaming consoles quickly. Instead, they opt to use their camera to click a photo of the screen. Taking screenshots using a phone camera is not an issue.
It is usually the annoyance of having to transfer the photo from a console to a device that is capable of social media posts. Also, the entire process in itself is cumbersome and doesn’t work well majorly for a couple of reasons. It takes up a lot of time and the image quality is poor due to compressions.
In this day and age where we consume most of the things through a screen, it becomes important to know how to use the screenshot feature in a device to quickly share information.
Since screenshots are so convenient, now each and every device offers this feature. Even gaming consoles like Play Station and Xbox allow you to take a screenshot to boasts of that great score. But fret not if you don’t know how to take a screenshot for this guide will help you. From PC to laptops to gaming consoles, you’ll learn how to take a screenshot on every device. So let’s jump right into it.
Screenshot Feature on PlayStation-
Normally the players on PS followed a tedious process. They used to capture pictures and send them to a friend, open the PS app on their phone and download it from there. With videos, it was all the more worse. They had to be uploaded to YouTube or Twitter and later on downloaded on your device. But with the below steps, life will become easy!
PS4-

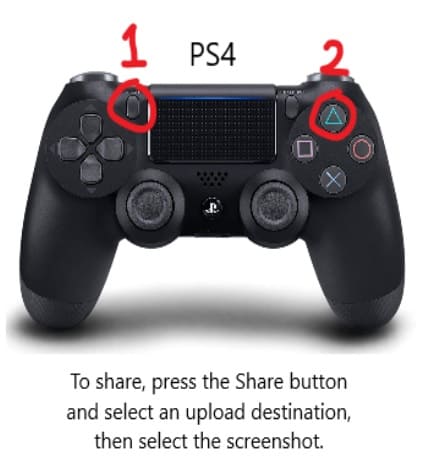
PlayStation 4 allows you to take a screenshot to immortalize your gaming experience. You can show off your high score or tease your friend for their failure or do anything as you please. You can even take a screenshot of your conversations on PS4.
To take a screenshot on PS4, click the SHARE button on your controller. You will have to hold down the button for a second or two and it will automatically take a screenshot. This is the easiest way to take a screenshot.
Yet another way to take a screenshot on your console is to press the SHARE button, which will pull up the share menu. All you have to do now is press the CIRCLE button on your controller.
To view the screenshot, go to the screenshot section of the game’s page.
PS5-

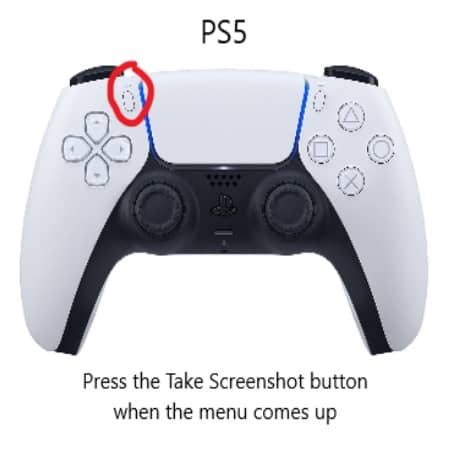
The new PS5 DualSense controller has replaced the SHARE button with the CREATE button. The create button does a lot of stuff, including taking a screenshot of your gameplay. The create button is located on the top-left side of your controller and has three parallel lines above it.
All you’ve got to do to take a screenshot is to press this create button and select screenshot. The image will be saved in the screenshot section of the game’s page.
Screenshot Feature on Xbox-

Xbox console too allows you to take a screenshot of your screen and it’s super easy. It works the same with video capture where one can quickly snap a screenshot or clip from the game and download it to the phone from the app right away.
It’s rather easy than say taking a screenshot on your laptop or PC. But Xbox only allows you to take a screenshot while you are in the game. You can’t take a screenshot of the home screen or other additional menus for whatever reasons.
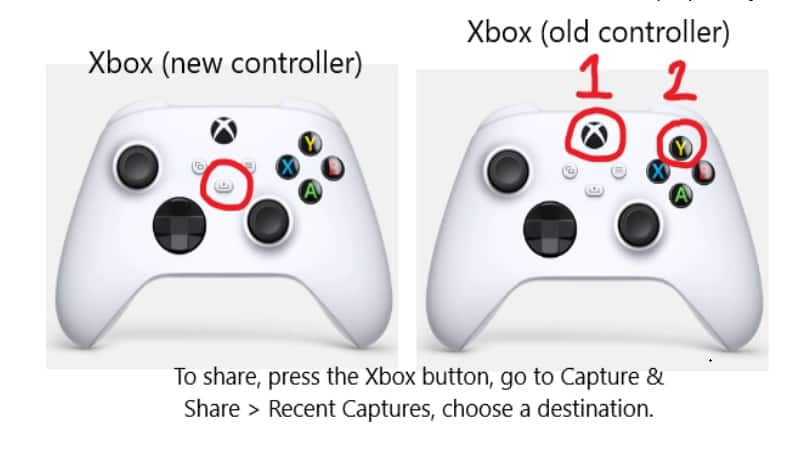
To take a screenshot on your Xbox, all you’ve got to do is to press the Xbox button (the button with the Xbox logo on it) while playing a game. This will pull up the guide and all you have to do is to press the Y button. This will save the screenshot.
To view your screenshot go to the ‘Recent Captures’ in the ‘Capture & share’ menu.
In terms of GUI and accessibility, the Xbox scores much ahead of PS. The ease is still not seen on the PS5 yet,
Screenshot Feature of a SmartPhone-
iPhone-
To take screenshots in older iPhones, all you had to do was to press the home button along with the volume button. But that is applicable only to the older models. With the new iPhone 11 and 12, all you have to do to take a screenshot is to click the side button along with the top volume button. This will automatically take a screenshot. You can view the screenshot in your gallery.
Android-
All Android phones almost have the same process to take a screenshot. Most android phones allow you to take a screenshot by simply pressing the power button along with the lower volume button. This is applicable to almost all the android phones available in the market.
Some new Android models have become all the more convenient and therefore all you have got to do is to click the power button. That’s it. On some phones, you don’t even have to click any buttons. Just swipe your four fingers from the top of the screen to the bottom and that’s it. So for Android users, there are countless ways to take a screenshot.
If you are struggling with how to take screen grabs on PC and Mac, here is a step by step guide
How to take screenshots playing PC games?
Windows-

If you need to take a screenshot on your computer or laptop, Windows 10 allows a bunch of methods but the most effective and easy ones are-
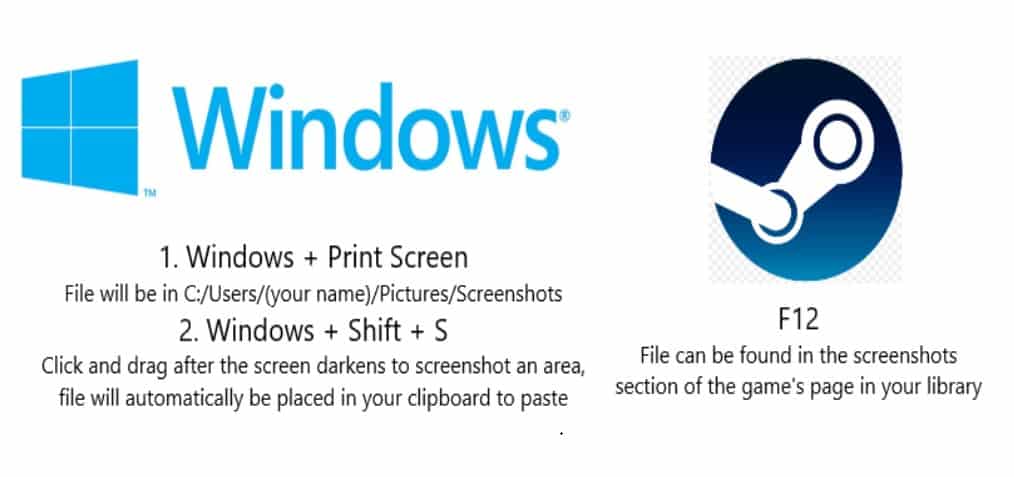
a) You can easily take a screenshot using the ‘Print Screen’ button. The button is usually labeled as ‘PrtScn’ in many keyboards and laptops, so look out for this button. On laptops particularly, you will have to use the command ‘Fn+PrtScn’ to take a screenshot.
b) Another way to take a screenshot on your laptop or computer is to use the command ‘Windows+Shift+S’. This will dim your screen and then you can select the area of which you want to take a screenshot. The selected area then will automatically be copied to the clipboard.
To access your screenshot, go to C: /Users/ (your name)/ Pictures/ Screenshot.
iOS-
To take a screenshot in your Mac Book laptop, all you have to do is to press Ctrl+ Show Windows. This will take the screenshot of your whole screen.
To take a screenshot of a particular area, then use the command ‘Shift+ Ctrl+ Show Windows’. This will enable you to drag and select a particular area that you want to capture.
Do share with us what all you are looking forward to!

